How to import a Hytale .blockymodel and PNG into Blockbench
A .blockymodel holds the shapes but not the paint, so you need two files: the model and its PNG texture. Open the model with the Hytale Models plugin, load the PNG, then edit and export a copy. This guide covers Hytale models in desktop Blockbench and the web app, and uses the public painted teapot from Myrlin Studio.
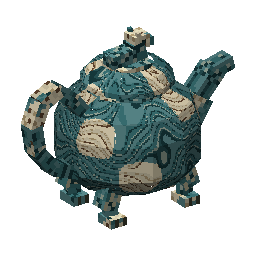
The published Studio preview of the model and atlas used below. The source has 149 nodes and a 512 × 512 PNG texture.
Inspect the teapot in 3D and see its source details →Download the model and its texture
Save both files in one folder, and keep an untouched copy before editing.
- model.blockymodel contains the shapes, hierarchy and texture coordinates.
- texture.png is the 512 × 512 painted atlas used by those shapes.
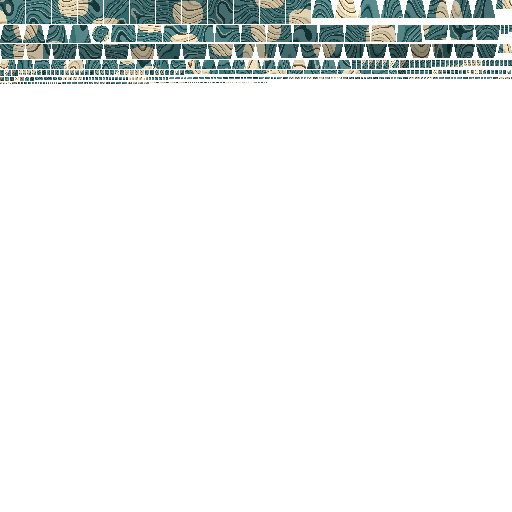
The model file does not contain the PNG image. Downloading the model alone gives you the geometry; you also need its matching atlas to see the paint. Keep the .blockymodel extension: the Hytale Models plugin reads that format directly.
Open the model and load the PNG
- Install the current Blockbench and the Hytale Models plugin. The plugin adds support for opening and editing .blockymodel files. Myrlin’s Tools is optional for this workflow.
- Open the downloaded
model.blockymodelin Blockbench. - In desktop Blockbench, the plugin may ask you to import textures. Choose Select Files and select
texture.png. If the model is already open without its paint, use Import Texture in the Textures panel to load the PNG.
The desktop plugin looks beside the model for a PNG whose name starts with the model’s file name, a PNG named Texture.png, or a folder named after the model with _Textures on the end. If it finds none, it shows an Import Textures box with Select Files, Select Folder and Skip. These two files are named model.blockymodel and texture.png, so load the PNG explicitly if it is not found. In the web app, use the Textures panel to import it; the web app does not search for textures.
Inspect the parts, then make a small edit
Rotate the model and compare its paint with the example above. In the Outliner, look for Handle and Spout. The handle contains seven named arc pieces; the spout contains three rising sections and a mouth. Selecting these parts shows how the asset is assembled.
For a first paint edit, select LidCrown, switch to Paint, and change a small area of the lid. Keep the atlas at 512 × 512 while working with its existing layout.
If you change geometry, watch the UV layout too. Hytale face UV sizes follow the face dimensions; the plugin’s Stretch controls let you adjust a cube’s size without changing its UV size. The official plugin usage notes explain these constraints.
Export the edited model and texture
- Use File → Export → Export Hytale Blockymodel to save the edited model under a new name, such as
teapot-edited.blockymodel. - In the Textures panel, right-click the texture and choose Save As. Save the edited PNG beside the model, for example as
teapot-edited.png. - Reopen the exported model and its PNG. Check that your paint change is present and that the handle, spout and lid are still where you intended.
Keep both exported files when you move or share your work. A model export and a saved texture are separate files.
If the import looks wrong
- The shape opens, but the texture is missing.
- Import
texture.pnginto the open model’s Textures panel. Confirm that you downloaded the atlas from the same example as the model. A missing texture message does not require another Studio build. - The paint is on the wrong parts.
- Reopen the untouched model with the original 512 × 512 PNG. Check that you did not pair it with another model’s atlas or resize the image. Compare this original pair before changing UVs or repainting.
- The Outliner count differs from the source’s 149 nodes.
- Blockbench elements and Hytale nodes are counted differently. A Hytale node can combine a group and its first cube. Click the element counter above the Outliner to see the Hytale node count; the plugin notes explain how groups and shapes are counted, and the Hytale model limits guide sums up the 255-node rule.
More causes, in Blockbench and in the game, are in Hytale model or texture not showing.
Use the edited source in your project
This walkthrough covers model and texture editing. Adding the asset to Hytale still requires the appropriate game definitions, bindings and an in-game test. The Hytale workflow guide explains that next step.
To start with your own object, open Studio with Hytale selected, describe its shape and paint, and review the build quote before confirming. You can also inspect the teapot’s source details first.
To understand what you just opened, read the .blockymodel format, explained.
Making a Minecraft Java model instead? This walkthrough covers Hytale files only. See the Minecraft model guide, or turn a picture into a Minecraft model.
Questions
- How do I open a .blockymodel file?
- Install Blockbench and its Hytale Models plugin from File, Plugins, then open the .blockymodel in Blockbench. Load the matching PNG texture if Blockbench does not find it by itself.
- Why does my .blockymodel open without its texture?
- The texture is a separate PNG. Desktop Blockbench finds it only when its name starts with the model’s file name, when it is called Texture.png, or when it sits in a folder named after the model with _Textures on the end. Otherwise choose Select Files, or use Import Texture in the Textures panel.
- Can I open a .blockymodel in the Blockbench web app?
- Yes. The Hytale Models plugin works in the web app, but the web app does not look for textures by itself, so import the PNG from the Textures panel.